Help - Granting Financial Authority
This application is used to ensure a delegate’s financial responsibility for an activity or project. Additionally, it captures and maintains all of the signatures for authorized individuals.
GFA is used by the central administration to verify that financial transactions are authorized by the appropriate users.
Roles
These are the roles that can be assigned in GFA.
- All financial transactions. This includes payment requests (ePR) and UShop.
- UShop approvals only. Individuals with this role cannot also approve payment requests.
- Evidence of Review (EOR) delegate. Individuals in this role cannot approve financial transactions.
Useful Information
-
Selecting “Designate Alternate” allows you to add/change a person on multiple accounts or to add multiple people on a single account. The account executive will approve these requests as to who can authorize financial transactions for an account.
To add one account to many alternates:
- Search by org, activity or project.
- The search results will share information like the type of transaction the alternate has access to, the dates when an alternate can authorize transactions and their status within the GFA system.
-
A person can be added to multiple accounts by selecting “One Alternate to Many Accounts” from the menu. You will need the employee’s name or uNID to search for them in the system.
- After selecting the individual you would like to add, search for the related org, activity or project.
- The search results will share information like the type of transaction the alternate has access to, the dates when an alternate can authorize transactions and their status within the GFA system.
- Select the rows you would like to change for this alternate before submitting the form.
-
- Account executives will need to select approve or deny for each individual request.
- Information will appear on the screen that shows the alternate’s name, funding source and the dates when they have the authority to authorize.
-
- This function is used to view who can spend on a specific account.
- You can search by org, activity, project or the dates they have the financial authority.
- Please note that all individuals who have been granted authority within the org will be displayed in this section.
-
An alternate’s term expires based on the original “Date to” information that was submitted. To extend an alternate’s authority, a new row will need to be added.
- Updating one account to many expiring alternates:
- All of the assigned alternates will be displayed with their current end date information. To update, click the plus (+) sign and add in the new end date.
- Updating one alternate to many accounts:
- Search for the alternate’s name or uNID. The alternate’s information should be displayed with a blank row at the bottom of the table. Enter the applicable information in that row and submit.
- Updating an alternate across multiple orgs:
- Select the “One Alternate to Many Accounts” option and search the user’s name or uNID.
- Click the “Update” button.
- This will display all of the activities and projects the alternate has the authority to sign.
- There will be a blank row at the bottom of each section – this is where you can add the new information before clicking submit.
- Updating one account to many expiring alternates:
-
If an alternate no longer requires the authority to sign, you will need to update their information in GFA.
- You will need to enter a new row, including the last date they had authority to sign for the activity or project as the “Date to”. Use the same date from the existing row as the “Date from”. The ensures the documents they signed prior to the change will still be processed.
Endowments 101
Endowment Income Projections Workshop
Frequently Asked Questions
-
GFA is the system developed to manage approvals for many types of transactions as we transition to more online or paperless transactions. Capturing signatures and replacing the information on the signature cards is version 1 of this system. Future versions will assign role-based authority to individuals and allow delegations to be managed within GFA.
-
A reasonable facsimile of your signature is captured and it’s only used to verify a wet ink signature. As long as financial transactions use paper, we will need a way to verify wet ink signatures. We are not capturing a “digital signature”. This low resolution image is not used to sign anything, only to verify.
-
Anyone who approves expenditures must be in GFA. Account executives, PIs, and organizational heads must capture their signatures. Account executives and PIs then can designate alternates who must also capture their signatures.
-
See this HowTo on capturing your signature.
-
Contact Financial Services at fis@utah.edu.
-
If you are the only one who signs on your Projects and activities, then you are done. If there are others who sign for you, then you will have to designate them as alternates.
-
An alternate is someone designated by the account executive or PI as authorized to sign for expenditures against a specific Project or Activity.
-
See this HowTo on designating an alternate.
-
Only an account executive or PI can approve an alternate request. If you are an AE or PI, see this HowTo on approving alternate requests.
-
Most likely the alternate has not captured his or her signature. Capture the alternate signature and then you can approve the alternate.
-
Anyone can make a request but only an account executive can approve an alternate. Note that when an account executive makes an alternate request, there is no need for an additional approval.
-
In the Financial Information Library, there is a folder called GFA. There, you will find a report called GFA Signatures by ORG, which will show which AE/PI/OH Signatures have been captured by ORG.
-
In the Financial Information Library, there is a folder called GFA. There, you will find a list of reports related to GFA that should address most of the questions.
-
This will have to be resolved by General Accounting. You can find your accounting contact listed at the bottom of your Management Reports or within a Chartfield Lookup.
-
This will have to be resolved by Grants and Contracts Accounting. You can find your GCA contact listed at the bottom of your Management Reports or within Chartfield Lookup.
-
No. The account executive and ORG heads are automatically approved. They do have to capture their signatures, however.
How Do I add one or more Alternates to a Project or Activity?

Select the "One account to Many Alternates" option from the "Designate Alternate(s)" Menu.
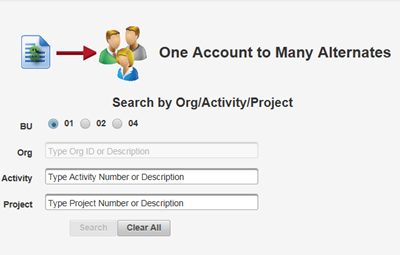
Input the the desired Activity in the appropriate criteria box. This is a smart search and will auto-fill as you type. When the desired Activity or Project appears select it and click on the “Search” button.
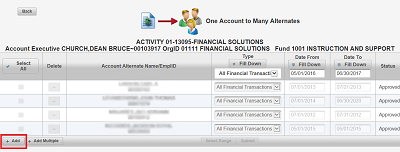
Click on the “Add” button to add Alternates to the Activity or Project.
1. Check the box in the first column for each Alternate being added.
2. Add the name of the Alternate in the “Account Alternate Name/EmplID” column.
3. Select Type of Financial Transaction using Drop Down Box
4. Input dates in Date From and Date 2 sections.
5. Click on the Submit button.
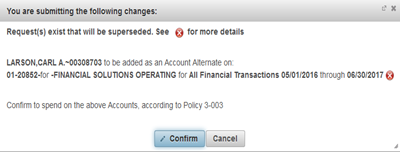
Click on the “Confirm” button on the pop-up window. If the pop-up window does not appear, press the “Enter” key on your keyboard. This request is now complete and will need to be approved by the Account Executive.
How Do I add an Alternates to one or more Projects or Activities?

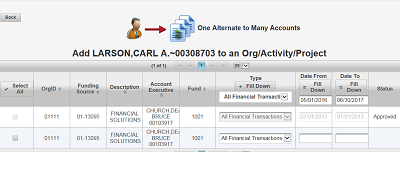
Select the “One Alternate to Many Accounts” option from the “Designate Alternate(s)” Menu.
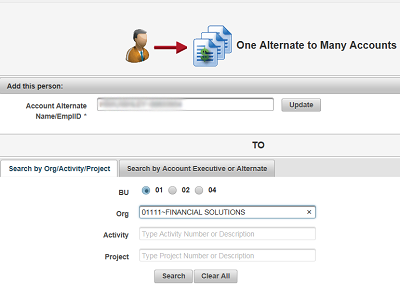
1.Input the name and/or employee ID in the “Account Alternate Name/EmplID” field. 2. Do not click the “Update” button.
3. Input the name of number of the Org/Activity or Project and select from the list that appears
4. Click the Search button
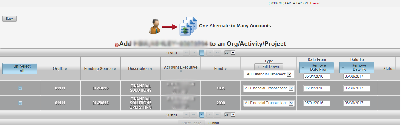
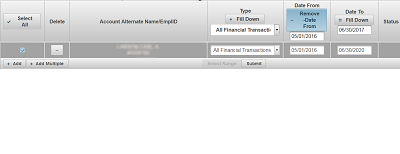
1.Select the Activities or Projects to add the Alternate by checking the box in the first column.
2. Input dates in Date From and Date to sections.
3. The fill down buttons can be used if there are many rows to add.
4. If a red x appears before the name, the signature needs top be captured.
5. Click on the Submit button.
Click on the “Confirm” button on the pop-up window. If the pop-up window does not appear, press the “Enter” key on your keyboard. This request is now complete and will need to be approved by the Account Executive.
How does an Account Executive approve Alternates?

Select the “Account Executive Approvals” option from the “Designate Alternate(s)” Menu.
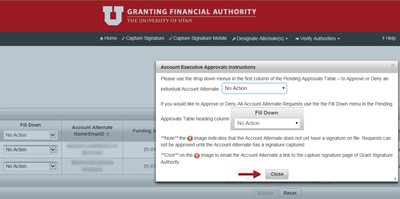
A list will be displayed with all the Activities and/or Projects and the pending Alternates. This list will be covered by an instruction page. Please click the “Close” button. If the pop-up window does not appear, press the “Enter” key on your keyboard.
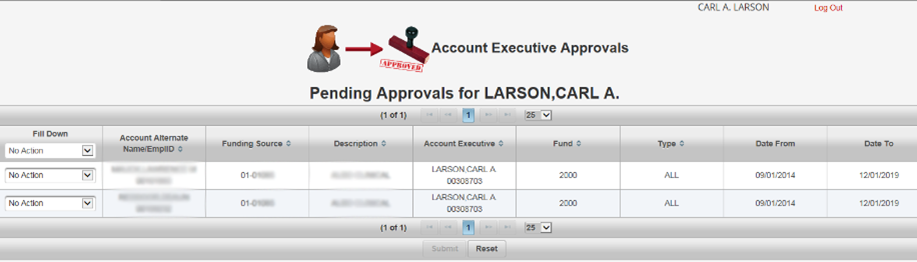
A list will be displayed .with all the Activities and/or Projects and the pending Alternates. This application is wanting you to approve/deny each request. A date range that each Alternate would have the authority to sign on your behalf is displayed
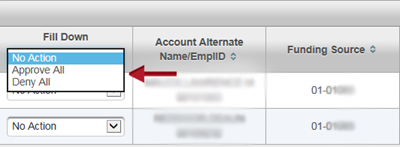
If you agree with all the pending Alternates”, you can select “Approve All” in the drop down list at the top. Or if you disagree with all the pending Alternates”, you can select “Deny All” in the drop down list at the top.

If you agree with some
and not other pending Alternates”, you can select “Approve” or “Deny” on each line.

After making all your selections,
click the “Submit” button at the bottom of the screen.
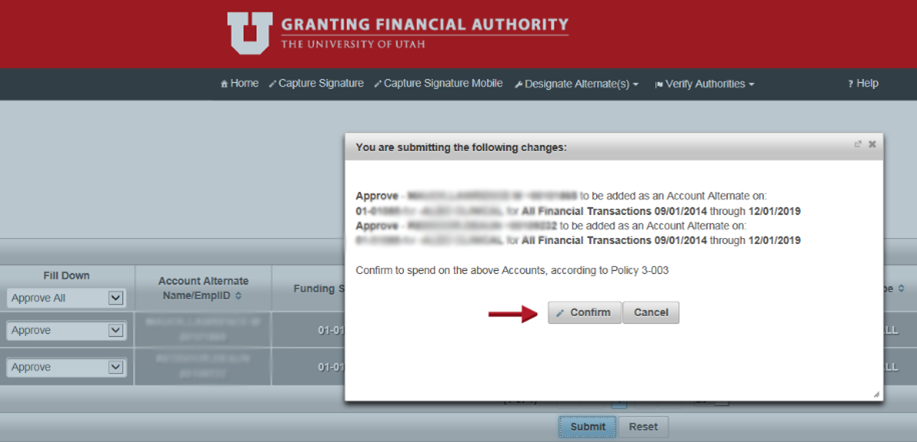
1. After clicking “Submit”, a small box will appear with all your selections.
2. You may need to scroll down to see them all.
3. Please select “Confirm”. If you do not see the “Confirm” button on the screen, press the “Enter” key on your keyboard.
4. This completes the process of Approving and/or denying Alternate requests in the GFA system.
How do I update an Alternates access to a Project or Activity?

Select the “One Alternate to Many Accounts” option from the “Designate Alternate(s)” Menu.

1.Input the name and/or employee ID in the “Account Alternate Name/EmplID” field.
2. Click “Update” button.
1.A list will appear displaying the current access for the Alternate.
2. Each Activity or Project will display two rows.
3. The first row is the current access that the Alternate has
4. The second row is to be used to update the access.
5. Select the Activities or Projects to be updated by checking a box in the first column
6. Input dates in Date From and Date to sections.
7. The fill down buttons can be used if there are many rows to add.
8. Click on the Submit button.

Click on the “Confirm” button on the pop-up window. If the pop-up window does not appear, press the “Enter” key on your keyboard. This request is now complete and will need to be approved by the Account Executive.